|
| |
Morrie's Engine Refresh
| Album Home
| Journal |
Arrival in Texas |
Repairs and Upgrades |
| Windshield Replacement
| Dash Pad Replacement |
Rocker Panel Replacement |
Just a note to visitors. Before you judge the actions and activities chronicled in the following pages, I think it would be helpful for you to understand the goals of this project. You will notice that I do NOT refer to this as an engine rebuild, but merely a refresh of the existing build.
The motor ran well before the teardown but had some issues I had hoped to address. These issues included oil leaks and compression in the engine and a weak clutch in the power transmission area. The plan was to buy some time while I acquired and refreshed an inexpensive stand in motor to allow me to drive the 912 without pressure to rebuild the motor quickly.
Due to the incredible efforts of Troy Berreth and Mitch Leben, I had nearly 400 photographs of the day's efforts. I have managed to cut this down to just fewer than 200 pics in total. I have sorted the pictures by activity and have placed links in this page to thumbnail pages containing photos relating to that part of the project. Please read, click, browse, and enjoy.
Saturday, November 22nd, 2003. This was the big day. The idea was to get a bunch of us together, pull the motor out of my 67, tear it down, fix what needs fixing, and get it all back together by that night. An aggressive plan, to say the least.
David Gilliland and I built up his motor to near long block status in a single day a few weeks ago in Dallas. David was coming down that morning and with his help, I was pretty confident that the job could get done. Also coming to help were Troy Berreth, Mitch Leben, and Brian Southwell of the Houston area. Pat Carmichael and his son, a couple of our newest members from the Dallas area, also joined us to see what really goes on inside one of these little engines.
Clicking on the image next to each paragraph will bring you to a thumbnail page that shows pictures associated with that particular step.
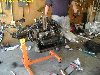
 The first step was to remove the motor and transmission from the car. This is pretty straightforward after you have done it a few times. Still, there are a couple things to take note of. The first step was to remove the motor and transmission from the car. This is pretty straightforward after you have done it a few times. Still, there are a couple things to take note of.
First, the height of the rear of the car. On mine, the bottom of the torsion bar tubes need to be about 20 inches off of the ground for the doghouse to clear the rear of the car, even with the rear panel removed. My standard sized jack stands will not go that high, so I made up bases out of a 2 X 4 to increase the elevation. The bases are nailed together for rigidity and the jack bases sit solidly on them.
The other thing I needed, and still do, is a bigger and better floor jack. To raise the rear of the car to an adequate height and be able to remove the motor with some confidence, a fairly large jack is needed. A motorcycle jack will remove the motor and transmission all by itself. An alternate method, which David Gilliland first showed me back in May, is to use a transmission jack and floor jack in tandem. With the right floor jack, this also provides a stable base for the whole engine and transmission. Thanks to a neighbor, I was able to borrow such a jack for the day.
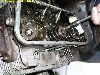
 OK, now we've got the motor out. Now, there is a ton of crap attached to it that is oily, cruddy, and in our way. These parts range from the tin to the transmission. We pulled the tin, removed the doghouse, and removed the exhaust and heat exchangers. This was the first indication of what kind of surprises we had in store. The vintage euro heat exchangers are supposed to expand enough end to end when the retainers are loosened to allow them to slide over the studs on the heads. This was not going to happen. Fortunately, I guess, the studs backed out on one end of each of the heads, indicating that we were not the first ones in there. As we pulled the bolts out, David laughed out loud and pointed at the nuts. "Do you know what these are?", he asked. "These are rod nuts! One time use!" We should have known this was going to be interesting. The rod nuts were not even installed with the same orientation. Well, save for this little development, separation of the superfluous stuff was pretty straightforward, as you can see in this set of pics that gets us up on the stand and ready for repairs. OK, now we've got the motor out. Now, there is a ton of crap attached to it that is oily, cruddy, and in our way. These parts range from the tin to the transmission. We pulled the tin, removed the doghouse, and removed the exhaust and heat exchangers. This was the first indication of what kind of surprises we had in store. The vintage euro heat exchangers are supposed to expand enough end to end when the retainers are loosened to allow them to slide over the studs on the heads. This was not going to happen. Fortunately, I guess, the studs backed out on one end of each of the heads, indicating that we were not the first ones in there. As we pulled the bolts out, David laughed out loud and pointed at the nuts. "Do you know what these are?", he asked. "These are rod nuts! One time use!" We should have known this was going to be interesting. The rod nuts were not even installed with the same orientation. Well, save for this little development, separation of the superfluous stuff was pretty straightforward, as you can see in this set of pics that gets us up on the stand and ready for repairs.
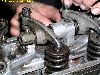
 Now it's time to pull off the heads, clean them up, and try to address some of the oil leaks and compression issues. We didn't run into too many issues while removing the heads, other than a couple of the studs unscrewing from the block instead of the head bolts. This was another indicator of issues with the previous assembly. Head washers were all there, but some of the studs had two washers under them and some had none. We initially thought we were short but a magnet allowed us to find all of them. The pictures in this link show the disassembly and clean up down to the tops of the pistons. Now it's time to pull off the heads, clean them up, and try to address some of the oil leaks and compression issues. We didn't run into too many issues while removing the heads, other than a couple of the studs unscrewing from the block instead of the head bolts. This was another indicator of issues with the previous assembly. Head washers were all there, but some of the studs had two washers under them and some had none. We initially thought we were short but a magnet allowed us to find all of them. The pictures in this link show the disassembly and clean up down to the tops of the pistons.
 From here we took the disassembled parts and cleaned them up thoroughly. We wire brushed the combustion chainbers and cleaned up the #1 exhaust valve which had been leaking. A good find here was a set of sodium filled valves, and to my surprise an 86mm big bore kit in pretty decent condition. The pictures in this link show the disassembled top end and some of the clean up down to the pistons. From here we took the disassembled parts and cleaned them up thoroughly. We wire brushed the combustion chainbers and cleaned up the #1 exhaust valve which had been leaking. A good find here was a set of sodium filled valves, and to my surprise an 86mm big bore kit in pretty decent condition. The pictures in this link show the disassembled top end and some of the clean up down to the pistons.
 Now that we had the parts functionally clean, the reassembly process could begin. The cylinders were honed to remove any glazing, the rings aligned, and the cylinders lapped and installed. Now that we had the parts functionally clean, the reassembly process could begin. The cylinders were honed to remove any glazing, the rings aligned, and the cylinders lapped and installed.
 The pushrod tubes are installed (new) and the head and rocker arm assemblies refitted and torqued. The pushrod tubes are installed (new) and the head and rocker arm assemblies refitted and torqued.
 Here we see the quick installation of a new (VW) clutch disc, cleanup of the flywheel, and final assembly to the long block state. Here we see the quick installation of a new (VW) clutch disc, cleanup of the flywheel, and final assembly to the long block state.
|